
Welcome to Tutorial 2!
If this is your first time to visit, please click on the button to the right side of this page that says “Start you tutorials here!”.
In Tutorial 1 we talked about your work area and a little about "Filetypes". By now, you should have an idea of how quite time-consuming “digital scrapbooking” is. Just looking for graphics and it already takes a long time but your hardwork will definitely payoff! Just you wait!
On this tutorial we’re going to learn more about FILETYPES.
The previous tutorial tackled PNG, jpeg, psd and tiff, as the file we will be using in this craft and that 90% of the time PNG is what we use because of it’s transparent background. I also mentioned that MOST PNG files are transparent but—NOT ALL! If you did your exercise on Tutorial 1, you must’ve already figured that out.
BUT there’s a way for us to turn PNG files with background into genuine PNG files!
Here’s how!
Remember that what we’re removing is the background, because we want to be able to paste them on top of the other like this:

But can you paste it if your PNG file looks like this?

PLEASE NOTE: All backgrounds could be removed but you might sacrifice the quality of the image. Go for graphics that have a “solid-color” background, meaning their background is just one color and not texturized. Please see image below:

So how do you remove the background?
1. Open the file in Photoshop.

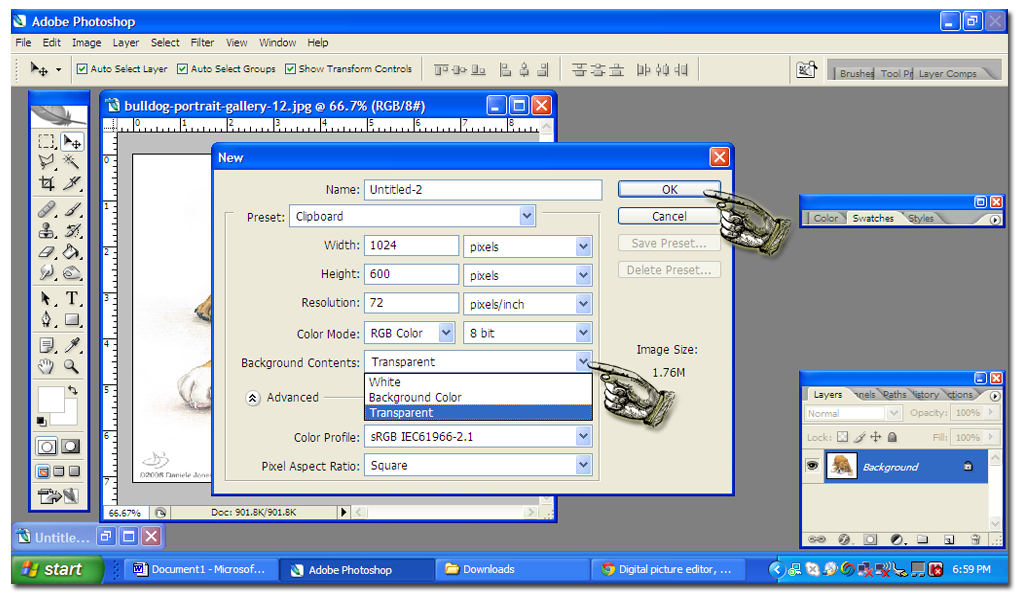
2. And then click on File > New to open a new document. A pop up will then appear that will show you the size and the properties of this new document you’re opening. Make sure you click on Background Contents and choose Transparent.
3. And then the new document should look like this. A transparent background should look checkered.

4. Minimize your picture screens to make sure you see everything in your window. Now you should see both the bulldog’s picture and your new document.
5. Click on the Magic wand tool to your left. And then click on the white background that you want to remove. Doing that will highlight the white background.

6. Right click on the white background so that a dropdown menu appears.

7. Choose Select Inverse so that this time the bulldog is highlighted.
8. Then click on Move Tool to your left.

9. Using the move tool, drag the bulldog into the new transparent document.

10. To clean up the image, use the Eraser Tool to your left. Now you have a transparent image!

11. Since the new document is too big, use the Crop tool to make it smaller. And then hold it down to the image until you get the right size. Right click it and then choose Crop.

12. Now it’s done! You may save the image by clicking File and then Save As and make sure you choose PNG as the filetype.
13. So let’s say you have a fancy background. Open it in Photoshop and then, using the move tool, drag the bulldog image into the fancy background for it to look like this. Isn’t it awesome!

Okay, so we already know how to remove the background from “False PNG’s”, but you know what? I HAVE GOOD NEWS FOR YOU! Now that you know how to remove the background you can do it on ANY FILETYPE, whether the image is jpeg or tiff you can always remove the background by doing the same thing!
MORE ABOUT FILETYPES:
- JPEG- is what most pictures are. Most great quality pictures are in jpeg format.
- TIFF - is usually for high-definition and large photos. Saving images in TIFF format preserves the sharpness of the image, but it also takes a lot of space in your computer memory.
- PSD - is a Photoshop-specific picture format, where all layers are preserved the way they are. Usually, if you're editing an image in Photoshop and you have multiple layers, but you couldn't finish it yet, you can always save it as PSD. In this format the layers are not merged into a flat image like the JPEG, TIFF and PNG. Now, I know this sounds very technical, but let me explain this in English, if you look at the screenshot on Number 13 in the Tutorial you'll see that the bulldog image was dragged into the fancy background. The bulldog is a PNG file and the fancy background is a JPEG file. The background is LAYER 1 and then the bulldog is LAYER 2 and that's what I mean by LAYERS. Sometimes you want to put more images, like flowers or balloons, but you have to postpone it for the next day. You can save the file as PSD so that you can still manipulate the layers, like, transfer the bulldog to the other side of the background when you finally decide to put flowers on the side where the bulldog was. If you don't save it as PSD, the bulldog will never be movable because LAYER 1 and LAYER 2 will automatically be merged.
EXERCISE: Download images from Google and experiment on putting together different images by converting them to PNG format. Your background could stay as JPEG since it's just where you paste the PNG images. Enjoy!
I hope this was very useful!
Please rate this tutorial if you find it interesting, fun, useful or difficult! (see buttons below)
Thanks guys!

Please note that all layouts are custom-made by Meg Jocson and Kick-Ass Ads.
A LOOK INTO WHAT'S NEXT: We're going to practice making a "Digital Scrapbook with all the elements to help you do it yourself. These elements are images that are readily downloadable but definitely needs conversion into PNG! "That's what's next!


